Mont Blanc is not an easy summit to come by. The normal routes on Mont Blanc are the Gouter Route / Bosses Arete, the Trois Monts Route and the Pope Route from Italy. While these routes certainly aren't pushing the limits of modern alpinism, they are all difficult and combined with the altitude and potential for inclement weather, there is no "easy" way to the summit of Mont Blanc.
My first trip to Mont Blanc this season was via the Gouter Route and began in a rainstorm. Not exactly how anyone wants to begin a trip, but hut reservations at the Tete Rousse and Gouter Huts and an improving forecast, we made moves up the mountain.
The trip began with an early 7am "alpinist train" from LaFayet to Mont LeChat near the Refuge Ni D'Aigle. The shiny new train loaded its mountaineering boot-clad passengers, let out a comical cartoon whistle sound and rolled into motion up the mountain.
We were let out near the Refuge Ni D'Aigle and began our hike to the Refuge De Tete Rousse. Soon we found ourselves donning Gore-Tex jackets and pants as a thin cloud moved in and began to cover us with a warm mist. Within about 2 hours we made it to the refuge and hunkered down as the storm rolled in. We set our waterproof layers and our boots out to dry, had a great pasta Bolognese for lunch and took a nap.
The next morning was summit day, but with a forecast for nasty weather early in the morning, we pushed our start time to a civilized 7am breakfast and started moving uphill around 8:30. Just above the Tete Rousse is the Grand Couloir, one of the most objectively hazardous areas on the Gouter Route. The Couloir is known for being a being a dangerous section and has been the site of many mountaineering accidents on Mont Blanc.
The Grand Couloir was in good shape, and we shoveled out the deep channel in the middle of the couloir to make travel faster and easier. After crossing the massive, snow-filled funnel we climbed a broken rock and snow arete to the Refuge de Gouter. This section is steep and exposed and many of the rock features were covered with verglas from the morning and previous day's storm. We moved carefully up to the hut where we stashed a few items and purchased some water before continuing on higher on Mont Blanc.
The Dome du Gouter (the section above the hut) was in great shape with firm snow that was excellent for cramponing. We made great time moving up that and the weather was perfect until we topped out on the dome. Here the wind picked up and became steady, strong winds from the east.
By the time we reached the Vallot Hut the winds were intense, and it was beginning to sap our body heat. We ducked inside the Vallot Hut to grab a quick snack and add our Gore-Tex layers to protect us from the wind. Gotta say, it was pretty nice to stop with a little respite from the wind!
Above the Vallot is the Arete des Bosses. This is a steep, knife-edge ridgeline with a series of exposed cornices and wind rolls. With exposure on either side of the ridge, it makes for an exciting section of climbing and with strong winds it can be dangerous. Despite the wind, our team was moving well and we kept climbing steadily higher, goggles and hoods protecting our eyes and faces from blowing snow and fierce winds.
We pushed on and soon enough arrived on the summit ridge of Mont Blanc! Amazingly, we were greeted on the top by calm winds! After soaking in the breathtaking view of the French, Italian and Swiss Alps and getting some food and water, it was time to start the descent.
The wind reappeared back on the ridge, but with a little less ferocity. We moved steadily and made great time back to the Gouter Hut, where we dined and slept for the night.
The final difficulty was descending the Gouter Arete and the Grand Couloir. We started early to cross the couloir while it was cold. Conditions had improved on the arete and the verglas has melted off and the crossing of the couloir was excellent as well - firm snow and no recent rockfall was nice to see!
]]>
When the weather is nice in the High Sierra alpine, there's no better place to climb than Temple Crag. With huge alpine rock routes spanning over 1,500', Temple crag boasts some of the longest continuous climbing in the High Sierra. The 4 major routes on the north face of Temple Crag, known as the Celestial Aretes, range in difficulty and length.
Celestial Aretes of Temple Crag, West to East: Venusian Blind (Red), Moon Goddess (Green), Sun Ribbon (Orange), Dark Star (Blue). Photo/Overlay: Zeb Blais.
From West to East the Celestial Aretes increase in length and difficulty. Venusian Blind, at 5.7 and about 12 pitches, is the shortest and easiest, but offers incredible movement and rock quality. The next arete is Moon Goddess, which goes at 5.8 and offers roughly 18 pitches of climbing, and has a bit more loose rock according to many climbers. Stepping up once from there is the Sun Ribbon Arete, which has one pitch with a 5.9+/5.10a sequence and is a bit longer, clocking in at around 23 pitches. Sun Ribbon Arete also has a longer snow/ice field to contend with to get to the start of the rock pitches and includes a Tyrolean traverse high on the route! The longest route by far is Dark Star, a mega alpine endeavor that goes at 5.10c and ascends 2,200' of rock.
Blue skies, no wind and mild temperatures made for a perfect alpine climbing experience last weekend. With short days we chose the Peter-Croft-"Awesome"-rated Venusian Blind. We could not have been more pleased.
Andrew standing above 2nd Lake on the approach to Temple Crag. Photo: Zeb Blais.
Current conditions at Temple Crag and in the High Sierra Alpine are splendid. With a weak winter, a warm summer, and no late summer snow, the approach and route were clear of snow, with the exception of the perennial ice patch between the bases of Venusian Blind/Moon Goddess and Sun Ribbon Arete. This patch was hard, deep blue ice! It would be fairly attention grabbing to get to the start of Sun Ribbon even with a set of aluminum crampons on approach shoes even with a light axe.
Climbing high on Venusian Blind on Temple Crag. Photo: Zeb Blais.
We avoided the short blue ice patch at the base of Venusian Blind by climbing through the rock band to the climber's left. This band is steeper and less featured than it looks from below, so the chimney option shown in many guidebooks is recommended.
Once we gained the first step, the third and 4th class terrain to get to the base of the climbing went quickly. For Sierra alpine rock, the features are very unique, and the rock is highly featured. Knobs, dikes and cracks abound, and the climbing is really fun, with steep and sometimes powerful moves above exciting exposure. The vast majority of moves are on positive holds and there is relatively minimal crack climbing required on Venusian Blind, considering that it is a blocky, granite route.
After climbing around a dozen pitches with wild exposure and incredible movement, we had made the plateau of Temple Crag. From there it was a a talus hike and a short section of very exposed 4th class climbing to the true summit, where we were rewarded with incredible views of Mount Sill, Middle Palisade, Norman Clyde Peak and the entire Palisades Traverse.
Middle Palisade and Norman Clyde Peak from the summit of Temple Crag. Photo: Zeb Blais.
Zeb Blais is an IFMGA Mountain Guide certified by the AMGA. He owns and directs Blackbird Mountain Guides and loves guiding rock in the High Sierra Alpine.
]]>Up high above the White Salmon Glacier on the Fisher Chimneys Route on Mount Shuksan. Photo: Zeb Blais.
For a relatively small mountain, Mount Shuksan (Shuk-san) packs a big punch. Stretching only 9,131’ above sea level, one might easily overlook this gem of the North Cascades. Luckily for Mt Shuksan, mountain climbing is more than just altitude.
Mount Shuksan hosts a huge variety of climbing, from straight-forward glacier romps to committing, technical routes that have found a place in Steck and Roper's 50 Classic Climbs of North America. The routes include the Sulphide Glacier, the North Face, the Price Glacier, the Northwest Couloir and the Fisher Chimneys.
One of our favorite routes on Mt Shuksan is the Fisher Chimneys. This route is pure mountaineering fun, and each section of the climb is engaging, beautiful and exhilarating without exposure to unreasonable hazards. With good movement skills, the route is fairly benign.
The Fisher Chimneys route as shot from Lake Ann. The Upper Curtis and Lower Curtis Glaciers are the glaciers pictured. Photo: Zeb Blais.
The Fisher Chimneys begins, oddly enough, with a descent. From the Lake Ann trailhead, we walk down nearly 1000’ feet to Swift Creek. The hiking is gorgeous and packed with old growth firs, crystal clear streams and sub-alpine meadows. From the creek, we regain that first 1000’ to get to Lake Ann.
Views from Lake Ann are stunning: the Jagged summit of Mount Shuksan comes into view, standing proudly above the hanging ice of the Upper Curtis Glacier. The Lake itself is often so stuffed with snow that it’s hardly more than a flat spot in the basin, but adds its share to the view when it melts out. The hike continues past Shuksan Creek, up a series of switchbacks into the North Cascades National Park.
The real fun begins after we cross into the Park. After some long traversing across snow or dirt trail, we come to a short step of 4th class rock. In early season conditions, snow can often provide a nice bridge to get onto the rock and avoid the slightly awkward climbing there, but it can be dangerous as the warm rock can melt the snowpack from below and weaken the snow bridge to the point of having a significant fall. Above this rock, the trail becomes a mix of exposed 3rd class climbing and dirt trail until we get to the elevation of the base of the Fisher Chimneys, roughly 6,000’.
Climbers ascending the Sulphide Glacier just above Hell's Highway. Photo: Zeb Blais.
The Fisher Chimneys can be hard to find. There are many similar features that are easily mistaken for the Chimneys and if there is no trail through the snow it can be easy to get off track. The trail through the talus is fairly worn in, so once you find the main track, take care not to lose it!
This is the start of the Fisher Chimneys on Mt Shuksan. If you don't see this alcove, you're in the wrong gully! Photo: Blackbird Mtn Guides.
The telltale to finding the entrance to the Fisher Chimneys is an arete that creates an alcove with a flat, gravelly area. This leads to a gully that splits into two short 3rd class climbing gullies. It's possible to ascend either side here, and at the top of the climber's right gully there is a tat anchor slung around a large rock with a rap ring on it. If you don’t see this anchor at the top of the first step, you’re in the wrong gulley! The Chimneys themselves are a series of exposed 2nd and 3rd Class trails with steps of 4th class climbing sprinkled in to keep things interesting. Despite the name Fisher Chimneys, there are no chimneys as one would think of from a rock-climbing perspective, the chimney features are actually broad gullies - no chimney climbing required!
The Entrance to the Fisher Chimneys on Mt Shuksan. After this snow patch (which later melts out to become just a scree field), the route goes right into a gully divided by a rib of rock. Photo: Zeb Blais.
Above the Fisher Chimneys is the start of the White Salmon Glacier. At the very top, it is just snow - I have never seen crevasses open between the top of the chimneys and Winnies Slide. Often the snow here is flat enough and/or soft enough to not need crampons, but they are basically mandatory on the Winnies Slide. Camping is available directly below the Chimeys and sometimes there are a couple of small spots available above.
Water is available from a stream that forms directly at the start of the Upper Curtis Glacier. This is a great flow that fills water bottles fast with a quick and clear flow that most people don’t feel the need to filter or treat.
Above camp at Winnies Slide, the route ascends then traverses the Upper Curtis Glacier to Hell’s Highway. The Upper Curtis is a great warmup for the day, with moderate slopes the lead to Hell’s Highway. This section can vary between having very well bridged crevasses or can pose significant hazard with sagging snow bridges covering cavernous crevasses.
Climbers on the Upper Curtis Glacier approaching Hell's Highway on the Mount Shuksan Fisher Chimneys. Photo: Zeb Blais.
Visually intimidating and imposing, Hell’s Highway is actually a fairly benign, 60m step of steep snow or alpine ice that provides access to the Sulphide Glacier and the summit pyramid. Above the Highway, the Sulphide’s west side often poses significant crevasse hazard, so it’s a good idea to traverse in toward the center of the glacier. The Sulphide continues its moderate flow up to the Summit Pyramid, where two main choices are typially taken.
The most common option to the summit of Mount Shuksan is via 4th Class gullies. This route usually departs the snow and trends climbers left (west) past a large arete that forms the gulley directly below the summit. If you choose this variation, go straight up and trend left to gain the summit in the easiest way.
The second option to gain the summit of Mt Shuksan is the Southeast Ridge. The Southeast ridge is more difficult climbing, clocking in at 5.6, with some fairly exposed sections of climbing compared to the main gulley. Despite sections of harder climbing, most of the ridge is 4th class and it’s fairly low commitment since it is easy to escape the ridge in many places.
The summit itself epitomizes the North Cascades: a small, blocky pinnacle with incredible exposure and position in the range. 360 degree views include a panorama of Mount Baker, Glacier Peak and the jagged ridges of the Pickets, Forbidden and more. The earth falls steeply away from the summit in all directions and the Price, Crystal, and Sulphide Glaciers are all on display.
Climbers rappelling down the south side of Mount Shuksan's summit pyramid. Photo: Zeb Blais.
The descent has a couple of options. Both usually include a series of rappels, but it is certainly reasonable to downclimb from the summit as well if your party is capable. Option 1 is my preferred way and begins from a 3rd class ridge extending south from the summit. Two rappels gets most people to the end of the arete, where the final rappel from the summit pyramid is taken. The second option descends the Southeast ridge to a rappel station that leads climbers back into the gulley, where it connects with the first option. This requires a bit of traversing across the gulley that can cause rockfall for parties below.
Getting back to camp and down the Winnies Slide. This is mostly a matter of retracing your steps back down the Sulphide Glacier and Upper Curtis. The crux for most parties here is desending Hell’s Highway, the Upper Curtis to get back to the White Salmon, and Winnies Slide. Depending on conditions and the skills of yor team, the steep pithes of Hell’s Highway and Winnies Slide can be time consuming or hazardous. Late season both of these slopes can be firm alpine ice and may take some skill with front pointing and high dagger ice axe position. If these sections feel out of your comfort zone, don’t ascend through them without a plan to get out! Many climbers will remove pickets that are left as rappel anchors, so don’t expect to leave a picket there on the ascent and find it there when you get back!
Descending the Fisher Chimneys themselves is best done as a downclimb rather than a series of rappels. Downclimbing is faster and safer for parties that can move appropriately on 4th class terrain, and long rappels in the upper Chimneys really increase the likelihood of rockfall, causing a major hazard for any climbers below. The anchors at the top of the Chimneys are best used only when there is snow in the gulleys which makes downclimbing more dangerous. Typically I find it best to only rappel the lowest 3 4th class steps that have fixed anchors, the rest should be downclimbable for mountaineers who have appropriate skill to be on this route.
The Fisher Chimney are one of the best intermediate mountaineering routes in the North Cascades. With incredible exposure, consistent and fun climbing that doesn’t require expert rock climbing or ice climbing skill, and magnificent views, Mt Shuksan's Fisher Chimneys deserves to be high on any Washington climber’s tick list!
]]>
Blackbird climbers up high on an empty Emmons Glacier route on Mount Rainier in July. Incredible weather and a solid team made for an awesome day on the most glaciated peak in the Cascade Range. Photo: Zeb Blais.
Blackbird teams summited Mount Rainier during a 5-day trip on the Emmons Glacier earlier in July. The trip, Mount Rainier Summit and Skills Expedition, is a skills-based program that includes a summit of the highest and most glaciated peak in the Cascade Range.
The Rainier Summit and Skills Expedition started with a gear check and orientation for the climb. We covered proper layering and helped climbers choose the most appropriate layers for the current weather, how to pack food for Mount Rainier, how to pack a large expedition style backpack, and concerns about climbing in Mount Rainier National Park such as conservation and Leave No Trace.
Our team ready to start the Emmons Glacier Route on Mount Rainier during Blackbird Mountain Guides Rainier Summit and Skills Expedition.
Our first day on the mountain began with a strenuous hike to Camp Curtis. With our packs weighing in between 40 and 50 pounds from 5 days of food and fuel, plus tents, sleeping bags and camping gear and our mountaineering equipment, we were happy to have cool weather and cloudy conditions to shelter us from the sun on the approach. Despite ideal hiking conditions and cool temperatures, the 5 mile and 4,300' hike was a full day. Once at camp, we set up our tents and settled in for the evening.
The route to Camp Schurman from the White River Trailhead on Mount Rainier.
Our second day was a short day of movement, which left a lot of time for skills at camp. After packing up at Camp Curtis, we moved to Camp Schurman at the tip of Steamboat Prow, the rock feature that divides the Emmons Glacier from the Winthrop Glacier. Brutal west winds prevented us from setting up tents right away, so we left our gear in place as we started in on skills on the eastern side of the ridge.
We had covered the Rest Step and other basic footwork, but we expanded on crampon techniques and covered ice axe arrest extensively. After movement skills, we set up a fixed line, like those used on Denali and 8,000m peaks like Mount Everest, and practiced ascending mountaineering terrain with the aid of fixed lines.
Tents at Camp Schurman on The Emmons Glacier Route of Mount Rainier. Photo: Zeb Blais
After ice axe arrest and fixed lines practice, we covered knots and hitches used in mountaineering. From the flat overhand to the butterfly, we covered the most critical knots that mountaineers need to know and which specific tasks each knot is used for in the mountains.
With basic rope skills down, we moved on to EARNEST anchors and how to build snow anchors. We covered how to place snow pickets, including vertically placed top clip pickets, vertically placed mid-clip pickets, and T-Trench or "Dead Man" anchors. From there, we revied the basic concept of mechanical advantage and how we can build mechanical advantage systems to increase the load we're able to lift in situations like crevasse rescue.
A massive crevasse on the Winthrop Glacier on Mount Rainier that we used for crevasse rescue practice during the Rainier Summit and Skills Expedition. Photo: Zeb Blais.
Day 3 was pure fun: Crevasse Rescue practice and Ice Climbing! We started off by dropping Blackbird guide Brandon Seymore into the abyss. After guide Zeb Blais demonstrated how to rescue our fallen comrade, the team took turns being lowered into the crevasse and leading the rescue from the surface of the glacier.
Being inside of a gaping crevasse is a wild experience and can only be appreciated from the depths of the ice! It's a really amazing way to experience a glacier and really underscores why we rope up on glaciers: we don't want to fall into them!
Learning basic ice climbing movement on the Winthrop Glacier on Mount Rainier during the Emmons Glacier Summit and Skills Expedition. Photo: Zeb Blais.
Ice Climbing conditions weren't ideal, but everyone had a great time learning efficient movement on steep snow and ice. Soft snow made for difficult climbing, so we picked a crevasse that was less steep. The conditions were great for practicing techniques that can be useful in ranges like the Cordillera Blanca, where steep snow climbing can be a necessary skill.
That night, we settled in early to prepare for the summit attempt. Getting up before dawn, we started climbing with nearly perfect conditions. Wearing only light fleece over our base layers, we took off towards the summit.
Taking a maintenance break during our summit climb of Mount Rainier via the Emmons Glacier Route. Photo: Zeb Blais
The route was in excellent condition thanks to an incredibly stormy spring and early summer. Massive snowfall made the route straight forward and the snow bridges over the crevasses were thick and strong. Despite knowing the history of crevasses on the Emmons and Winthrop glaciers from many years of trips on the mountain, there were little signs of these gaping divides during our climb.
Near the top of the Emmons, a large bergschrund forced the route to the Winthrop near the saddle of Curtis Ridge and Columbia Crest (the true summit of Mt Rainier. After end running this massive crack, we made our way to the summit crater, where we celebrated the summit in perfect weather!
Our team on top of Mount Rainier during the Blackbird Mountain Guides Summit and Skills Seminar on the Emmons Glacier.
The descent went smoothly, and our teams managed the deep, sun-softened snow with ease. Back at camp we were happy to get our boots off and use our tents to take a break from the intense sun.
Day 5, our last day of the program since we didn't need to use our weather day, we packed up early and made our way down to the InterGlacier to take advantage of conditions there before things got too soft. Glowing from a perfect summit day and an incredible experience on the mountain, we made it down to the trailhead with a sense of accomplishment!
Descending from Camp Schurman to the Inter Glacier on Mount Rainier. Photo: Zeb Blais
]]>Tocllaraju is a classic climb in the Cordillera Blanca and the hardest part of the climb is at the summit. The summit is pictured here above the last few pitches of the West Face route. Cordillera Blanca, Peru. Photo: Zeb Blais.
After success summiting the three previous mountains in our series, we were excited to climb the highest peak on our list: Tocllaraju. At 6,034 meters (19,800’), Tocllaraju reaches almost 1700’ higher than our previous peaks and has much more serious climbing. We were attempting the Normal Route, the NW Ridge, and we had been hearing of many teams being shut down before the top due to crevasses and a bergschrund cutting off access to the summit within the last few hundred feet of the climb.
We were talking to anyone who had attempted the peak, gathering as much information as we could, to determine what was causing the problems and if there might be a way to the top. Rena, the other IFMGA Mountain Guide who was leading our second rope team on Tocllaraju, had heard that a team of Ecuadorians had summited via the West face, finishing on a 60m fin of steep and spicy snow to gain the top. Other than that, there was a European team of 2 Germans and an Austrian that had made it via the West Face, topping out on a wild steep looking pitch of snow in the last 60m of the climb as well. We had heard of no other teams making the summit.
Bergschrunds (the highest crevasses on the mountain) on Tocllaraju were preventing many teams from summitting the classic climb in the Cordillera Blanca of Peru. This shot shows the route we took to end run the crevasse. Photo: Zeb Blais.
Reports from teams that had attempted the Normal Route while we were in the Ishinca Valley were mostly bleak, and we had not heard of any successful attempts to end run the bergschrund in either direction. A father/son team from Colorado had some positive news that they had made it past the ‘schrund via a jumble of seracs going up the climbers left side of the divide, but inclement weather and a short, but steep pitch of exposed ice had put an end to their attempt. Rena’s information had said the teams went right at this bergschrund, so we had nothing but some vague and conflicting reports on options to summit the Andean massif.
Despite the uninspiring news, we were determined to give the summit our best shot. We rested for a day after Ishinca, then made the steep trek to moraine camp at 5,100m. Not gonna lie, our porters made the hike to Moraine Camp really easy and the logistical support that is available and really affordable is one of the incredible luxuries of climbing in the Cordillera Blanca. When we arrived to camp, our tents were set up and our Hernan and Mastedonio, our cooks, had a freshly made hot soup ready for us. Our porters and cooks really allowed us to focus on being ready for the summit!
Climbing above the first steep section of the Northwest Ridge on Tocllaraju. The route to the top is usually more straightforward, but this year the bergschrund near the top meant that the climbing was harder and less direct than normal years. Photo: Zeb Blais.
Moraine Camp at Tocllaraju is spectacular. Nestled between granite towers and slabs on a steep perch above Tocllaraju’s west glacier, this camp is so close to the west face that you can almost reach out and touch it. It can sometimes be a very windy camp, but the weather before our climb was still and clear.
We woke early, knowing that if we wanted a chance to summit Tocllaraju, we were in for a long day. The morning started off like the evening: clear, cold and still. One of our team members was dealing with an acute GI/Stomach issue, so our team started off smaller than expected. As we gained altitude on the glacier, the winds picked up and soon gusts were blowing snow into our faces and pushing us around. As we started the first steep pitch of climbing, the wind hurled loose snow grains from the surface down the slope into our faces and eyes, causing us to pause and shield ourselves from stinging ice pellets. We fought to our first anchor, transitioned to short roping and finished out the steep climbing on the glacier climbing together in close.
When the glacier flattened, we paused to add layers. The sun was rising, but the wind that comes with sunrise in the Cordillera Blanca is often the coldest part of the day and we bundled up to stay warm. We climbed for a few hours wearing our down parkas, synthetic puffies, fleece tops, long johns and softshell pants, navigating crevasses and the rolling terrain of the Northwest Ridge.
Soon enough, we came to the crevasse that had been giving teams trouble at 5800m. A long wave of ice loomed above us, leaving an overhanging glacial wall to the left of us, with a series of broken seracs piled between the two sides of the crevasse. To the right, the crack was spanned by a jumble of ice making a steep and exposed (but feasible) route around the gaping crevasse before us. The seracs to the left was the option that the Colorado team had mentioned, and to the right was the option that Rena’s colleagues preferred. Neither option looked easy, but with the combination of exposure to a crevasse fall and expecting to find soft, faceted snow on the jumble to the right, we opted to try left.
I meandered through the broken seracs to the left, choosing my steps carefully with the threat of the crevasse below my feet on my mind. The snow held and soon we arrived at the end of the road: the steep and exposed North Ridge. A steep step, huge exposure the east face of Tocllaraju prevented us from gaining the ridge. After sizing up the climb, I took the lead and Rena put me on belay. I carefully climbed the steep snow and ice, delicately placing my feet and plunging the shaft of my axes in for purchase. Due to poor snow quality on the ridge, I used a hip belay backed up with a vertically placed, mid-clip picket, to belay the rest of the team to the ridge.
Once we had gained the ridge, the rest of the climb was a series of steep pitches and a traverse across the West Face of Tocllaraju. The snow was mostly faceted and picket placements were questionable in most places. It was definitely beneficial to have a couple SMC pro-pickets along for making quick anchors using the strength of the snow deeper in the snowpack. After one short traverse led by Rena, I led the first steep pitch across the West Face. I ended my pitch inside of a crevasse, using the wall of the crevasse direct the rope and provide a ridge to counterbalance my weight on the anchor. Rena finished the traverse, getting us to the base of the summit pyramid, 60m from the top of Tocllaraju.
Rena led the final steep pitch of snow to the summit. One of his friends had opened the line and he jumped on with confidence, stepping across a crevasse onto 65+ degree faceted snow.
Kicking into the deep snow and moving steadily up the pitch, Rena was soon on the summit with an anchor to belay us up. We started climbing the steep, soft snow with absolutely stunning views for 360 degrees, including the massive West Face of Tocllaraju, which was now directly below our feet. Now climbing at nearly 20,000’, the experience became surreal: hundreds of feet of steep snow and glacial ice, plastered onto Tocllaraju, lay between us and camp. Below, silty, turquoise alpine lakes glistened and the green farmlands of the lower valleys contrasted our current scene, where limited shades of snow, ice, rock and sky were the only colors in the palate.
On top, the feeling of relief was as incredible as the views. We had made the summit, despite the abnormal challenges of the route and we were feeling good! We enjoyed the views, radioed our team in camp below, then got to the business of the descent. With 3 rappels and some exposed slopes to deal with, the descent of Tocllaraju is not a gimme.
Our team on the summit of Tocllaraju, enjoying mild conditions after the fierce winds at sunrise had subsided. Strong winds often accompany the sunrise in the Cordillera Blanca of Peru and we were glad they died down for the summit! Photo: Zeb Blais.
We found the first pre-established rappel anchor, backed it up, and rappelled down. The rappel was wild, overhanging and a full 60m. We moved down to the next anchor and performed another rappel. This time the rappel took us over two overhanging drops, separated by a plug of ice that had to be navigated on rappel. Another impressively wild rappel! Down climbing connected with a glacier interval in our rope, we reached the last rappel station, which, for once, was just a straightforward, steep snow rappel. From there, the descent was a pleasant walk back to camp across the rolling glacier we had ascended in the morning.
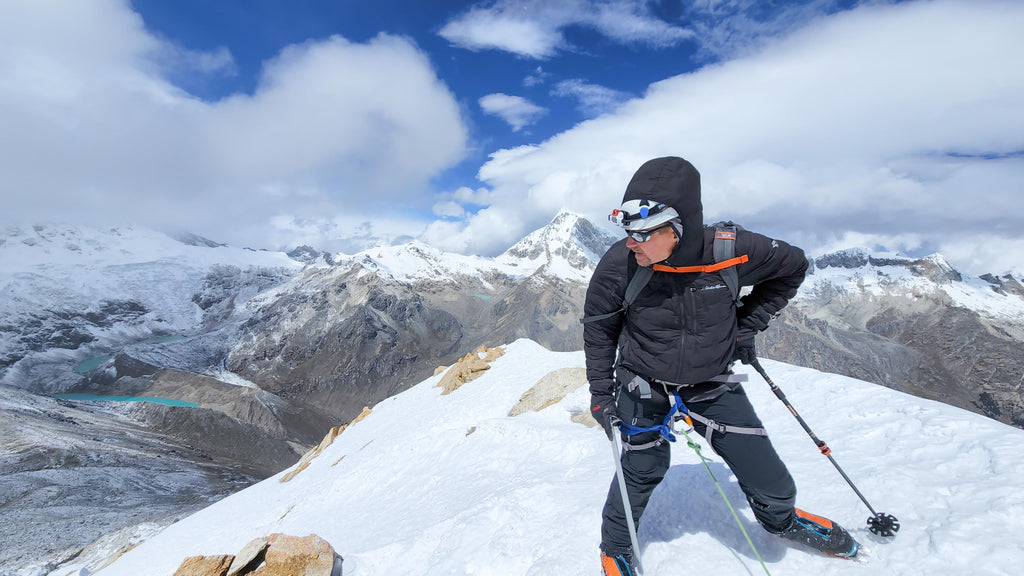
Rappelling from the summit of Tocllaraju in the Cordillera Blanca of Peru. The descent requires 2 to 3 rappels and some exposed downclimbing. Photo: Zeb Blais.
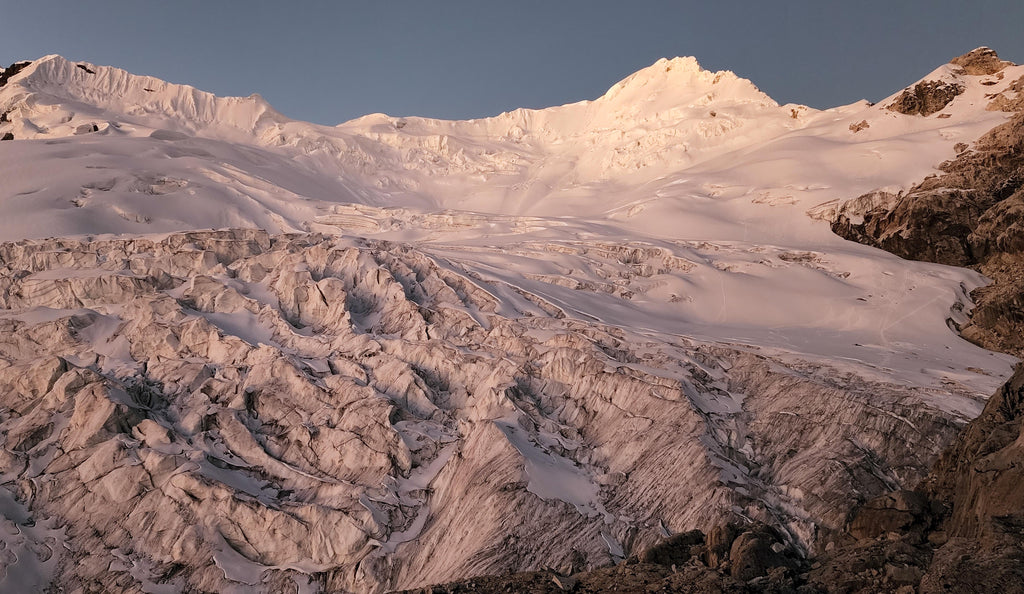
Back at camp, we were greeted with 5-star service – hot food and bags packed for the descent back to Ishinca Base Camp. The day wasn’t over yet! We ate, finished packing and started the 1.5 hour journey downhill to our camp low in the valley for our last night in the Ishinca Valley.
Incredible views of 6,000m Ranrapalca and Ocshapalca from the descent of the Ishinca Traverse in the Cordillera Blanca, Peru. Photo: Zeb Blais
After a wild and windy summit on Urus Este, we were feeling well acclimatized, but ready for a mellow day. A hike to the beautiful, turquoise waters of Laguna Milluacocha at the base of Tocllaraju and Palcaraju, was just what we needed.
After a leisurely morning and a tasty breakfast from our excellent cook, Hernan, we started our hike to the lake. The trail was in great shape, wide and covered with sod most of the way and only a few rocky sections to contend with. The view from the moraine that contains the almost fluorescent alpine lake was well worth the hike and the team basked in the sun, explored the ridge and soaked in the 360-degree panorama. After a few hours at the lake, it was time to return to camp to prepare for Ishinca.
The beautiful turquoise waters of Laguna Milluachocha in the Ishinca Valley. A perfect rest day hike to prepare for climbing in the Cordillera Blanca. Photo: Zeb Blais
The Ishinca Traverse is an excellent way to climb Ishinca. It’s possible to traverse from West to East (clockwise) or from East to West (Counterclockwise) and both ways have their merits, pros and cons. We opted for Clockwise, to ascend the Northwest climbing route and descend the SouthEast slopes.
The clockwise approach has the advantage of ascending the steepest terrain of the traverse and descending the lower angle terrain on the south side while enjoying the view of 6,000m giant Ranrapalca along the way. In addition, this direction of the traverse descends the south facing terrain, which this year is still holding soft, faceted snow on shadier slopes with moderate steepness (the steeper south terrain gets more shade in the southern hemisphere).
Our team gaining the north Ishinca Col on the Ishinca traverse. Photo: Zeb Blais.
The one big drawback of going clockwise is that the finale of the day, where the trail reunites with the approach trail, is steep talus and loose dirt with serious exposure to cliffs. The walking and scrambling isn’t hard, but it does require attention and good footing, which can be challenging at the end of a long day. Once again, the views save the day and, even in this section of engaging terrain, a brief pause to admire the raw power of the jagged rock, hanging glaciers and glowing alpine lakes is enough to restore the energy of even the most exhausted climber.
Looking back up at the summit of Ishinca from the Southeast slopes during the Ishinca Traverse. Photo: Zeb Blais.
Our alarms rang, breaking the silence of the night. Packed and ready to go, we made our way to the dining tent for breakfast. We finished our food and hot drinks, dropped our down parkas and started across the valley floor, headlamps illuminating braided trails, cow patties and streams. We navigated a route we had scoouted the previous day and tied into the well-trodden trail to Ishinca and Ranrapalca.
With a single layer of light fleece over our base layers, the cold night air kept us at a perfect temperature as we ascended switchback after switchback. As we approached Laguna Ishinca, the first rays illuminated Ranrapalca, turning it from cold, brown to shining gold. The light of dusk and dawn in the Cordillera Blanca is spectacular, and this morning was no different. Steep rock and ice catching thick rays of sun always provides a boost in energy, optimism and enthusiasm.
Early morning light adding color and definition to Ranrapalca during the Ishinca Traverse. Photo: Zeb Blais
We crossed streams and scree and donned crampons on the west glacier of Ishinca. This was by far the coldest part of the day, with the cold of the night combining with katabatic winds to create a biting cold that made us appreciate our down jackets. The snow was cold and firm: excellent for cramponing and we appreciated the ideal climbing conditions as we ascended the glacier to the north col of Ishinca. The glaciers were stuffed with heavy, late season snow and there were little signs of the wide crevasses that we knew existed under our feet. We plodded along to the base of the summit pyramid where we took a maintenance break for food, water, and sunscreen and to drop some warm layers. The sun was in full effect at this point, and we were trying to shed heat instead of contain it.
The last few slopes leading to the summit were steep and exposed, but the climbing conditions were still very good with supportable snow to the summit and we short roped to the top. The day was perfect: a few small clouds, a tiny breeze at the very top and nearly unlimited visibility across the entire range. We were feeling good! The views of Tocllaraju, Palcaraju, Ranrapalca and Urus Este from the third summit of our trip were breathtaking, as if Ishinca was a podium from which to view the grandeur of the Cordillera Blanca.
The descent began with a lower and a magic trick. The Southeast side of the summit pyramid is always a steep pitch, and was in down-climbable condition when we descended it. But, with speed and security on my mind, I lowered the team before then rappelled off a Reciprocation Hitch, a hitch that allows for a quick rappel without taking out the entire rope. The “magic trick” is retrieving the rope: with a few tugs on each end, the rope drops off the anchor and falls to the ground in one fell swoop. I quickly reset the rope for glacier travel and we began our descent of the southeast glacier with striking views of Ranrapalca looming above us.
Our descending Ishinca peak on the Southeast Slopes in The Cordillera Blanca in Peru. Photo: Zeb Blais
The glacier went quickly and soon we were removing our crampons and starting down the loose and exposed trail back to the Ishinca Valley. The team cruised smoothly across the steep cliffs and back to the switchbacks to camp. Tired from hiking and climbing over 9 miles at altitudes between 14,000’ and 18,000’, we arrived at camp satisfied with an awesome day of climbing in the Cordillera Blanca.
Next up on the Cordillera Blanca Blog: Being the 3rd team to Summit 6,034m (19,800’) Tocllaraju in 2022
]]>
Hiking into the beautiful Ishinca Valley in the Cordillera Blanca, Peru. Photo: Zeb Blais
After acclimatizing and refreshing ice climbing and mountaineering skills on Yanapaccha, our team took a well deserved rest day in Huaraz to prepare for our next objective: The Ishinca Valley. The Quebrada Ishinca, as it is known in Peru, is one of the Cordillera Blanca’s most famous valleys. It’s stunningly beautiful, has ideal and widely dispersed camping for large groups, and is home to 5 massive peaks: 5,420m Urus Este, 5,530m Nevado Ishinca, 6,162m Ranrapalca, 6,274m Palcaraju and our main objective for the trip, 6,034m Tocllaraju (Tok-ee-a-rah-hoo). It even has a Refugio, Refugio Ishinca, which was open for lodging, meals and drinks before the Covid-19 Pandemic started (it is uncertain when it will reopen).
The season thus far had been an interesting one, with lots of storms and late season snow. On Yanapaccha, the weather was good enough for a summit, but clouds threatened our climbing for much of the time we were there. Only on the hike out did the weather fully clear, but weather patterns on the approach to Ishinca Valley followed suit and on our way into camp we were greeted by thick clouds and light snow.
Our team hiking the trail to begin the ascent of Urus Este in the Ishinca Valley in the Cordillera Blanca, Peru. Photo: Zeb Blais.
Aside from weather, news from the Ishinca Valley was that only one team had made the summit of Tocllaraju, and the route to the top was broken. Large bergschrunds and crevasses extending across the peak were preventing teams from making the summit without going to extraordinary lengths to pass the cracks. This was unsettling news, but we knew we needed more information to make our own decisions on the conditions of the route.
We attempted our first peak of the Valley, Urus Este, on our first day in Ishinca. Waking up before dawn, I got out of my tent to start the day and was greeted by cold temps and a centimeter of fresh snow blanketing camp. Winds up high looked fierce, and figuring the snow would be deeper up high, we pushed back our start to let things warm up and see if weather improved.
Scrambling the 3rd class rock to gain the Glacier on Urus Este in the Ishinca Valley of the Cordillera Blanca, Peru. Photo: Zeb Blais
Starting after sunrise with warmer temps, we hiked up the steep trail leading to the 3rd class rock and glacier guarding the summit of Urus Este. The hiking trail is steep and demanding, with lots of big steps, loose dirt and very small switch backs that make you dizzy turning back and forth for over a thousand feet of gain. The views make up for the grind of the trail though, and as we hiked, glimpses of the towering Ranrapalca and Ishinca peaks appeared from the clouds. Two of our team members elected to descend near the top of the switchback trail to avoid pushing themselves too hard in the altitude.
The third class rock section just below the glacier was a welcome change to the trail, but as we climbed, the winds increased, pelting our faces with freshly fallen graupel. The storm intensified as we moved onto the glacier, and soon we were leaning into the wind and getting blown back and forth by gusts well over 60mph (and, coming from the Sierra Nevada, I know what 60mph feels like!). Covering every bit of our faces and the edges of our sunglasses with our buffs, we pushed on.
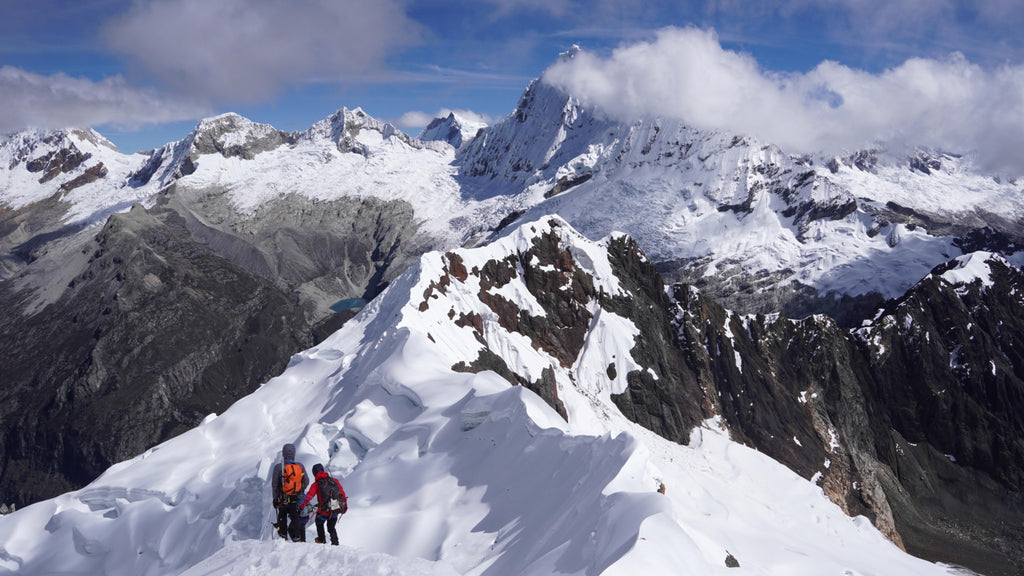
A team climbing next to us closing in on the top of Urus Este in the Ishinca Valley, Cordillera Blanca, Peru. Photo: Zeb Blais.
Luckily, the surface of the snow was perfect for crampons and the climbing conditions on Urus Este were quite good. We pushed through the wind, keeping our backs toward the constant push of air, stopping briefly behind a massive boulder for a quick gulp of water and respite from the wind.
Standing on the windy summit of Urus Este in the ishinca Valley of the Cordillera Blanca, Peru. Photo: Zeb Blais
We made the summit of Urus Este, bracing ourselves to keep from being blown off the steep summit pyramid, snapped a couple of very quick photos, and started our descent. This was a stark contrast to my last summit of Urus Este, in which we took a leisurely break on top to soak in the sun and enjoy incredible views of Tocllaraju, alpine lakes Laguna Akillpo and Laguna Milluancocha and the surrounding Cordillera Blanca.
A team of climbers descends Urus Este in the Ishinca Valley on a stormy day in the Cordillera Blanca. Photo: Zeb Blais.
Moving steadily, we descended the glacier and followed ribbons of snow through the third class rock until it was time to remove our crampons. When we could remove our spikes, we were low enough that we were below the winds and after a short section of scrambling through chunky granite, we were back on the trail back to camp.
After a day of braving the famous winds of the Andes and making the summit of a super fun peak in the Ishinca Valley, we were ready for a fresh cooked meal from our Cook Hernan. Having donkey support and a cook at camp is truly a luxury that makes the trip so much more fun for the whole team, and our crew was grateful for the support from Hernan and his assistant Mastedonio.
Up next on our Peru Blogs: Nevado Ishinca. Stay tuned for our second peak in the Ishinca Valley in the Cordillera Blanca of Peru!
The Blackbird team standing on top of Yanapacha in the Cordillera Blanca of Peru on June 21, 2022. Photo: Zeb Blais.
Two days ago, all members of the Blackbird team stood on the summit of Yanapacha in the Cordillera Blanca of Peru. The weather was fantastic and the climbing conditions were fun and engaging, making it an unforgettable day.
Sunset on Yanapacha in the Cordillera Blanca of Peru.Photo: Zeb Blais.
We began from base camp at 3:30 am. The night was warm and clear and we started in only a light fleece over our base layer tops. The climb begins with a rocky trail to the fern line of the glacier, where a steep step of ice provides access to the snow covered glacier of the West Face of Yanapacha. With our bodies feeling somewhat adjusted to the altitude, we were feeling good by the time we hit the glacier.
The first pitch of steep climbing on Yanapacha in the Cordillera Blanca, Peru. Photo: Zeb Blais.
After climbing the short pitch of ice to get onto the glacier, we traversed across the broken glacier to the start of the steep climbing. Conditions on the lower angle part of the glacier were excellent with widespread firm and supportable snow. As the glacier steepened, the snow became faceted and hard to climb. Areas where seracs or cornices had fallen and work-hardened the snow were much easier to climb. We aimed for these to make travel more efficient and headed to a crevasse crossing on the climbers left that avoided many of the overhead hazards on the right side of the route.
IFMGA Guide Rena nearing the summit ridge of Yanapacha in the Cordillera Blanca of Peru. Photo: Zeb Blais.
We set our anchors at the lower side of the crevasse and began climbing steep snow. The snow was soft and our ice tool placements were often not supported by substantially strong snow. After searching for harder spots and taking a few swings with each tool, we’d find placements that were good enough to move up on the steep snow. The front points and secondary points of our crampons were doing the bulk of the work keeping us engaged on the wall.
A Blackbird team standing on top of the summit ridge of Yanapacha in the Cordillera Blanca, Peru. Photo: Zeb Blais
After two pitches we were within a few feet of the summit ridge. From here there were two options to gain the summit: a steep, snowy chimney that previous climbers had burrowed through the cornice overhanging the slope we were on, or traversing left to the end of the cornice and ascending the knife edge ridge to the summit block from there. Renato Rodriguez, our Chilean IFMGA expat guide living in Huaraz, Peru, boldly opted for the icy chimney. I decided against the overhanging chimney of soft snow and intermittent ice and went for the ridge option.
Rena pulled through the steep chimney and began belaying his team to the ridge as I brought my climber to the ridge at the same time. The ridge was amazingly exposed: steep snow and cornices in both directions with hundreds to thousands of feet of steep terrain below. We anchored our teams to the snow with picket anchors as we coiled our ropes and began short roping our climbers to the summit of Yanapacha.
Despite the exhilarating relief and steep terrain, the climbing was straight forward and our teams were moving well. We moved smoothly up the ridge as clouds moved in and out, threatening to take away our visibility, but never doing so completely.
IFMGA Guide Zeb Blais and the Blackbird team on the summit of Yanapacha with Pisco Oeste and Pisco Este in the background. Cordillera Blanca, Peru. Photo: Rena Rodriguez.
We reached the top with thick clouds to the west, obscuring our view of Huascaran and Chopicalqui. Thankfully, we were able to see to the northeast and we got amazing views of Chacraraju and had good visibility for our descent, which was definitely welcomed given the exposed ridgeline we had to descend.
A Blackbird team descending from the summit of Yanapacha in Peru. Photo: Zeb Blais
The descent went smoothly and quickly. We down-climbed the summit snow pyramid to the ridgeline where there was a fixed picket that had been established by a previous team. We backed it up with one of our own to test the fixed anchor and rappelled a full 60m pitch to another previously established anchor. Rappelling with our other set of 60m ropes, I backed this anchor up with a picket and threaded the second set of ropes through the lower anchor as the rest of the team rappelled down to me.
Rena rappelling from the summit ridge on Yanapacha in the Cordillera Blanca in Peru. Photo: Zeb Blais
After our second rappel, we were off of the steep, exposed terrain and back onto the glacier. We transitioned to roped glacier travel and began our descent on the glacier. The snow was perfect for plunge stepping and made for quick travel. Mindful of the looming seracs, we made our way back to the fern line of the glacier and lowered everyone back to the rocky moraine.
Back at camp we were greeted by our camp cook, Hernan, and his assistant, Mastedonio, who treated us to a delicious lunch of taquitos with fresh guacamole and Causa, a Peruvian specialty of potatoes, chicken and sauce. We hastily kicked off our boots, guzzled some water and gorged ourselves on the fresh food! Our afternoon was a lazy one, relaxing in our tents and napping after our early morning climb.
Rena rappelling from the summit ridge on Yanapacha in the Cordillera Blanca in Peru. Photo: Zeb Blais
The next day, on our hike out of the Llanganuco Valley, the weather was spectacular. Tiny clouds dotted the otherwise crystal clear sky and we got incredible views of a massive part of the Cordillera Blanca. The Chacraraju and Pisco Oeste looked amazing standing next to Yanapacha and the Huandoy group’s sharp towers pierced the sky with jagged rock.
Rounding the corner from our camp, Huascaran Sur, the highest peak in the Cordillera Blanca and in Peru, reared its head along with its slightly shorter brother, Huascaran Norte. These peaks are so magnificent that they command your attention for the entire hike. They are massive, covered in glacial ice hundreds of feet thick, and incredibly steep. The Cordillera Blanca has countless peaks like this, which is one of the reasons it is such a magnificent range. It is not a one-hit-wonder with one or two main attractions, the list goes on and on.
Views of Peru's Cordillera Blanca on our way out from Yanapacha. From right to left: Huascaran Norte, Huascaran Sur, and Chopicalqui. Photo: Zeb Blais.
As we neared the trailhead, another gem of the Cordillera Blanca came into view: 6,354m Chopicalqui. Views of Huascaran, Chopicalqui, the Huandoys and the Laguna de Llanganuco and Llanganuco Orconcocha was the perfect way to end our trip in the Llanganuco Valley. Content and excited about our summit success, we headed back to Huaraz.
]]>
Yesterday we started the process of acclimatizing for the altitude we’ll experience while climbing 4 peaks in the Cordillera Blanca over the next two weeks. The 4 peaks we’ll be climbing include one over 6,000m (almost 20,000’!) and 3 over 5,000m. Tocllaraju is the highest peak on our itinerary at 6,034m (19,797’) and before we tangle with Toc, we need to make sure that we’re ready for the altitude.
To acclimatize for the Cordillera Blanca, we begin with moderate hiking to high elevation lakes and ramp up to camping at higher elevation and summitting the lower peaks on our itinerary. The lower peaks we have planned are still pretty high - between 17,900’ and 18,150’! These are Yanapacha (5460m), Urus Este (5495m) and Nevado Ishinca (5530m).
Hiking at 14,600' above Lake Churup on an acclimatization hike in the Cordillera Blanca.
To acclimatize for our low peaks, we started with a beautiful hike to Lago Churup at the base of it’s namesake peak, Churup. An ideal acclimatization hike for climbing in the Cordillera Blanca, the trek to Lago Churup is mostly easy, but quite high. The altitude ranges from 12,400’ to nearly 14,600’ if you take the extension to its smaller, higher sister lake, Lago Churupita. Round trip it took us roughly 6 hours at a leisurely pace that was perfect for getting ourselves used to the altitude without pushing too hard.
Panoramic views of the Cordillera Blanca during our hike to Laguna Wilcococha in the Cordillera Negra.
Today, we hiked in the Cordillera Negra, which provided panoramic views of the Cordillera Blanca and the peaks that we’ll be climbing. This hike will be a moderate trail hike ending with yet another alpine lake, Laguna Wilcacocha.
Our climbing will start tomorrow, as we trek into the Quebrada (Valley) Llanganuco where Yanapacha is the main attraction. Despite it’s standing as the lowest peak in the list, it's still a monster that tops out at 17,913’ and it's going to be a really fun and engaging climb. It features steep snow, pitched ice climbing and multiple rappels on the descent.
After we finish our attempts in the Quebrada Llanganuco, we’re on to the Quebrada Ishinca for our last 3 peaks, Ishinca, Urus Este and Tocllaraju. This valley is a very popular destination due to the multitude of climbs available there.
Stay tuned for updates on our progress!
The first views of the Cordillera Blanca from Conococha Pass make you want to leap out of the van and start climbing!
Today, we boarded our Mercedes Sprinter for the long drive north to Huaraz, Peru, the gateway to the Cordillera Blanca. After a nice breakfast with fresh eggs and tropical juice, we boarded our shuttle and started the long journey to Huaraz.
The shuttle was comfortable and the long drive was a great opportunity to catch up on sleep. Until you get into the Andes Mountains, the scenery is bleak and quite desolate. There are few trees and the land is flat and there is almost nothing to look at, so you’re not missing much to sleep through the drive!
Pollo Saltado, a traditional Peruvian dish, was delicious at our lunch stop!
We broke up the drive with a quick stop for lunch. While I’m still not able to bring myself to do it, some more adventurous than I ordered the Cuy – fried guinea pig. These little buggers are a staple in Peru and elsewhere in South America, and if you can handle it, apparently they’re not bad!
Cuy, also known as Guinea Pigs, appear on the lunch menu throughout Peru and South America.
The Cordillera Huayhuash is another incredible mountain range in Peru, just south of the Cordillera Blanca. It is seen here from Conococha Pass.
As soon as the glowing peaks of the Cordillera Blanca and the Cordillera Huayhuash appeared at Conococha Pass, we were instantly enthralled. When these mountains first come into view they are intense – huge, steep and brilliant white. They contrast the barren landscape and look absolutely ferocious – like the fangs of a wolf, piercing the sky. It’s a surreal view and the peaks are so vivid it’s shocking.
Two of our climbers enjoying the courtyard at our hotel in Huaraz.
We checked into our hotel, a nice little oasis in the city, and walked toward the city center for food. There are lots of good restaurants in Huaraz, but finding the right spots can be a challenge. With a few good restaurants up our sleeve, we grabbed a great meal at Creperie Patrick, a nice place with traditional Peruvian food and crepes...go figure!
Dinner at Creperie Patrick in the center of Huaraz, Peru.
Teams guided by Zeb Blais in 2016 on Pisco Oeste, another amazing peak in the Cordillera Blanca.
2022-06-15 Today our team arrived safely in Lima, Peru for this year’s Cordillera Blanca climbing trip. We’re attempting to climb 4 peaks, up to 6,000m, over the next couple weeks including Yanapacha, Ishinca, Urus Este and Tocllaraju. The climbs involve glacier travel, steep snow, steep ice and moderate rock climbing at high altitude and they’re all located in one of the world’s most magnificent ranges: The Cordillera Blanca.
After leaving yesterday afternoon, our flights from the US went miraculously smoothly. We landed at 6:35, snagged our luggage and cleared customs. At 7:30am our team was greeted by our driver, Carlos, at the gates of Lima’s Jorge Chavez International Airport and brought to our hotel in the hip, oceanside neighborhood of Miraflores.
The stunning shoreline of Miraflores and San Isidro en route to Huaraz and climbing in the Cordillera Blanca.
After check-in, we grabbed a delicious breakfast of roasted avocado, eggs and toast. Today’s itinerary was light and meant for exploring Miraflores, resting after the long flight, and enjoying some of the city's excellent restaurants before departing for our main destination, Huaraz, tomorrow.
A note to travelers: only change enough money at the airport to get you to your hotel and to grab a quick snack. The exchange rate at the airport at both the “cambio” (money changing booth) and the ATMs is abysmal and is really only for people who are stuck with zero other option to get money at the airport. Rates there were 3.43/usd from the Cambio and 3.57 from the ATM, while rates on Avenida Larco in Miraflores were 3.72/usd. I’m sure there are better places to change money, but this was close enough to published rates.
Miraflores is an awesome neighborhood. Stretching from the ocean for tens of blocks inland, it’s a vibrant spot with restaurants, bars, hotels and live music. We spent most of our day resting, exploring the Miraflores and sampling the food before reconvening to enjoy a meal as a team.
Two members of our team enjoying Amore, one of Lima's delicious food offerings, before heading off to climb the Cordillera Blanca outside Huaraz. Photo: Zeb Blais.
Loving life in Peru! Eating well is a huge part of our preparation for climbing in the Cordillera Blanca - and it's one of the most fun parts of the trip!
Dinner at a nearby restaurant, Amore, was delicious! A beautiful terrace seating and a simple, tasty menu featuring local dishes made this a perfect place for dinner that was also Covid friendly.
Well, enough for now, we’re off to Huaraz first thing in the morning!
So, you’re wondering... where is the best place to learn mountaineering? We’ve got some great ideas on what makes a mountain a good place to learn mountain climbing, but before we get into that, let’s dive into the nitty gritty of what mountaineering is.
Mountaineering is a network of skills that allow climbers to understand and manage the inherent risks of the mountains as they try to achieve their objective. The objective might be summiting a peak or ascending a specific route on a mountain. Regardless of the objective, part of the goal is always to make it back home safely. A famous Ed Viesturs quote, from the summit of one of the world's highest peaks (Manaslu, 8,163m), sums it up well: "Getting to the top is optional. Getting down is mandatory."
A huge part of being a mountaineer is not just achieving your objective, but getting it done in good style. At first you might think, “who cares how someone got to the top? If they made it up and back in one piece, they got it done!” Style is what separates a mountaineer from someone who achieved their goal through luck. With great weather and perfect climbing conditions, lots of people are able to summit mountains.
Climbing in good style is recognizing hazards and choosing appropriate techniques to manage them. Great mountaineers, through experience and mentorship, develop a keen sense for the hazards that are coming their way and manage them using a variety of skills and techniques. Risk management might be rerouting the climb to avoid an overhanging serac, to bring extra gear for a crevasse fall or to simply turn the climb around when the risks have become too great to manage.
Mountaineering skills that experienced mountaineers have in their quiver include:
So, where is the best place to learn to climb mountains in good style and build skills like these? The best venues are places that have realistic exposure to some of these hazards and allow us to practice skills without getting too far beyond our capabilities. We want realistic terrain without an overwhelming number of objective hazards. One of the best places in the US to learn mountaineering is Mount Baker.
Mount Baker is a perfect place to learn mountaineering skills with a guide or experienced mentor. It offers glaciated terrain, steep slopes, huge seracs that can be managed effectively with appropriate route finding, and just enough altitude to feel the effects of thin air and offer a challenge. With a guide, you’ll get all of the advantages of being in this terrain without having to manage advanced techniques like crevasse rescue or being exposed to life threatening hazards like the hanging serac on Colfax Peak.
Mt Baker is the second most glaciated peak in the lower 48 after Mt Rainier, and boasts 7,000’ of relief (elevation gain from the trailhead to the summit)! There are no easy ways up the mountain without traveling on a glacier, which makes it mandatory to have basic glacier travel skills. The easiest routes on the mountain are moderate glacier climbs and at 10,781’, the summit is high enough to be challenging, but not as excruciating as some of its Cascade neighbors, like 14,411’ Mount Rainier or 14,179’ Mount Shasta.
Baker is also a great place to train for difficult weather. While the summer months are usually characterized by high pressure and excellent weather, the winters are long and often boast intense snowfall well into spring. Baker currently holds the world record for snowfall in a single season, at 1140” (95 feet), which explains the large glaciers blanketing all aspects of the mountain.
Baker's two most popular routes, the Coleman-Deming and the Easton Glacier, are excellent places to learn mountaineering skills. These routes have plenty of inherent hazards to manage such as icefall, rockfall, crevasses, steep slopes and the potential for inclement mountain weather and whiteouts, but the climbing is moderate in the grand scheme of mountaineering. The hazards are generally managed with planning, route finding and movement skills rather than technical rope systems. In other words, you don’t need to climb 5th class rock or water ice to reach the summit on the normal routes on Mt Baker.
The Easton Glacier, on the south side of Mount Baker, offers less exposure to seracs and is often a more straightforward climb. This route still covers complex glaciated terrain, but avoids the massive Colfax serac and an often full width crevasse that can form around 8,000’ on the Coleman-Deming route.
The Easton route also offers crevasses close to camp that are often ideal for practicing crevasse rescue. Practicing crevasse rescue in a real crevasse requires careful site selection to make sure the area is safe from other crevasses and offers an appropriate working area that isn’t too steep. You don’t want to have your crevasse rescue practice become an actual crevasse rescue! Often it’s better to practice on a steep, snowy slope, rather than an actual crevasse, to practice the snow anchors and systems. Once you have these down, practicing in a real crevasse (or at least completely vertical drop off with a snow covered lip) offers a lot of key learning outcomes. In a real crevasse, where you build the anchor, how you prep the lip, and what type of mechanical system you use will have a huge impact on how well the rescue goes!
Beyond Mount Baker, there are other peaks that offer great venues to practice mountaineering skills. If you're looking to learn mountaineering skills try to find peaks that offer a few challenges and expand your skills set, without getting in over your head.
Mount Shasta not only boasts one of the 50 Classic Ski Descents of North America, but also offers a nearly perfect place to learn mountaineering skills. The West Face is pictured upper left, the rocky ridge in the center is Casaval Ridge and the large gully on the right is Avalanche Gulch. Photo: Zeb Blais / Blackbird Mountain Guides
Mount Shasta is another great place to learn mountaineering skills. Like Baker, it offers over 7,000’ of relief or more from the trailheads to the summit, and, at 14,179’, also adds the significant challenge of high altitude. Unlike Baker, there are routes to the summit of Mount Shasta that are not glaciated, which keeps things simple if you don't want to worry about glacier travel. If you are looking for a glacier challenge, there are significant glaciers on north side of the mountain as well, Shasta offers a wide range of options for those looking to step up their climbing skills.
If you’re going without a guide or mentor, try to find peaks that don’t have huge exposure to objective hazards, but allow you to practice the skills you want to build. Local peaks with short, steep slopes are great for learning crampons, ice axe and rope skills. Practicing winter and snow camping in the mountains close to home is a great way to dial in those skills without being left high and dry if you have problems with stoves, tents or sleeping pads.
Manage the hazards with caution and don’t add too many too quickly! Make sure that you stack the deck in your favor. If you have a more experienced team, you can handle more challenges. With a less experienced team, you’ll want to minimize the hazards.
Join us on a Mt Baker Mountaineering Skills Seminar this spring or summer! These programs are the perfect way to summit peaks and build a ton of useful mountaineering skills!
]]>Our concise video for How to do The Rest Step. It's a simple technique, but it is easy to get wrong. Make sure you're doing this technique correctly to save as much energy as possible on your climb.
From simple hikes to standing on top of Mount Everest, the rest step is the most important skill you can employ to reduce energy output and improve your chances of success. For long, endurance based climbing and ski mountaineering objectives It is essential for efficient movement on terrain with any sort of incline.
Watch the video, then review the principles described below. Hit us up with any questions: info@blackbirdguides.com !
Perfect terrain for the rest step! Here climber's put the rest step to use tackling Pisco Oeste in Peru's Cordillera Blanca range. Photo: Zeb Blais / Blackbird Mountain Guides.
The Rest Step is a technique that saves a tiny amount of energy every time you step. Over the course of a long climb this really ads up! Photo: Zeb Blais / Blackbird Mountain Guides.